Adventures of A Wild Food Experimentalist
Adventures of A Wild Food Experimentalist
Making sushi and nori sheets from scratch using wild seaweed varieties, wild fungi, lacto-fermented wild garlic leaf, fruit, and pickled rose blossoms.
---------------------------------------++++++++--------------------------------
"Life is too short to try and work out how to make nori sheets from scratch!"
- a fellow foraging friend
 |
| Mixed nori and nori-style sheets |
 |
| Finished sushi (recipe at the end of the blog). |
When I’m not out foraging I’m usually still thinking about foraging, wondering where I can find this or that delicious wild edible, wondering how best to harvest, prepare, process and store my wild finds, wondering how certain plants, fungi and seaweeds have come into cultivation whilst others have remained stubbornly and gloriously wild, wondering why certain edibles are popular in some countries and not others. Seaweed is a good example of this. In Great Britain we are as phycophobic as we are mycophobic. That’s a great pity. Personally I’m a big fan of the briny, slimy stuff, and a deep and primitive fascination with seaweeds seems to be worked in to my DNA.
Of course, I'm not the only one. Ole Mouritsen a professor of biophysics at the University of Southern Denmark, is a distinguished cheerleader for seaweeds and the potential they hold. He sums up our phycophobic reluctance with an apt comparison. “The most important thing about getting people to use seaweed is to get people to focus on flavour. The problem is that most people associate it with something rotting on the foreshore. Suppose you had never seen apples and you see apples rotting on the ground – you would never think of eating apples. That’s the connotation most people have with seaweeds”.
I look forward to reading a translation of Ole's new book, ‘Sushi: Food for the Eye, Body and Soul’, due to be published in English this spring, as well as his excellent looking book, Seaweed, edible, available and sustainable. (Quotes taken from Stuart Freedman’s excellent article for Effilee Magazine on the Welsh Laverbread tradition).
The fact of the matter is I love seaweeds, and I love them as much as I love solving conundrums, such as the one below............
For a number of years I've been a big fan of sushi, usually prepared with rice and raw marinated fish, but also purely vegetarian, vegan and, more recently, even completely raw vegan versions. Of course, what literally holds all this together is the nori sheet.Of course, I'm not the only one. Ole Mouritsen a professor of biophysics at the University of Southern Denmark, is a distinguished cheerleader for seaweeds and the potential they hold. He sums up our phycophobic reluctance with an apt comparison. “The most important thing about getting people to use seaweed is to get people to focus on flavour. The problem is that most people associate it with something rotting on the foreshore. Suppose you had never seen apples and you see apples rotting on the ground – you would never think of eating apples. That’s the connotation most people have with seaweeds”.
I look forward to reading a translation of Ole's new book, ‘Sushi: Food for the Eye, Body and Soul’, due to be published in English this spring, as well as his excellent looking book, Seaweed, edible, available and sustainable. (Quotes taken from Stuart Freedman’s excellent article for Effilee Magazine on the Welsh Laverbread tradition).
The fact of the matter is I love seaweeds, and I love them as much as I love solving conundrums, such as the one below............
 |
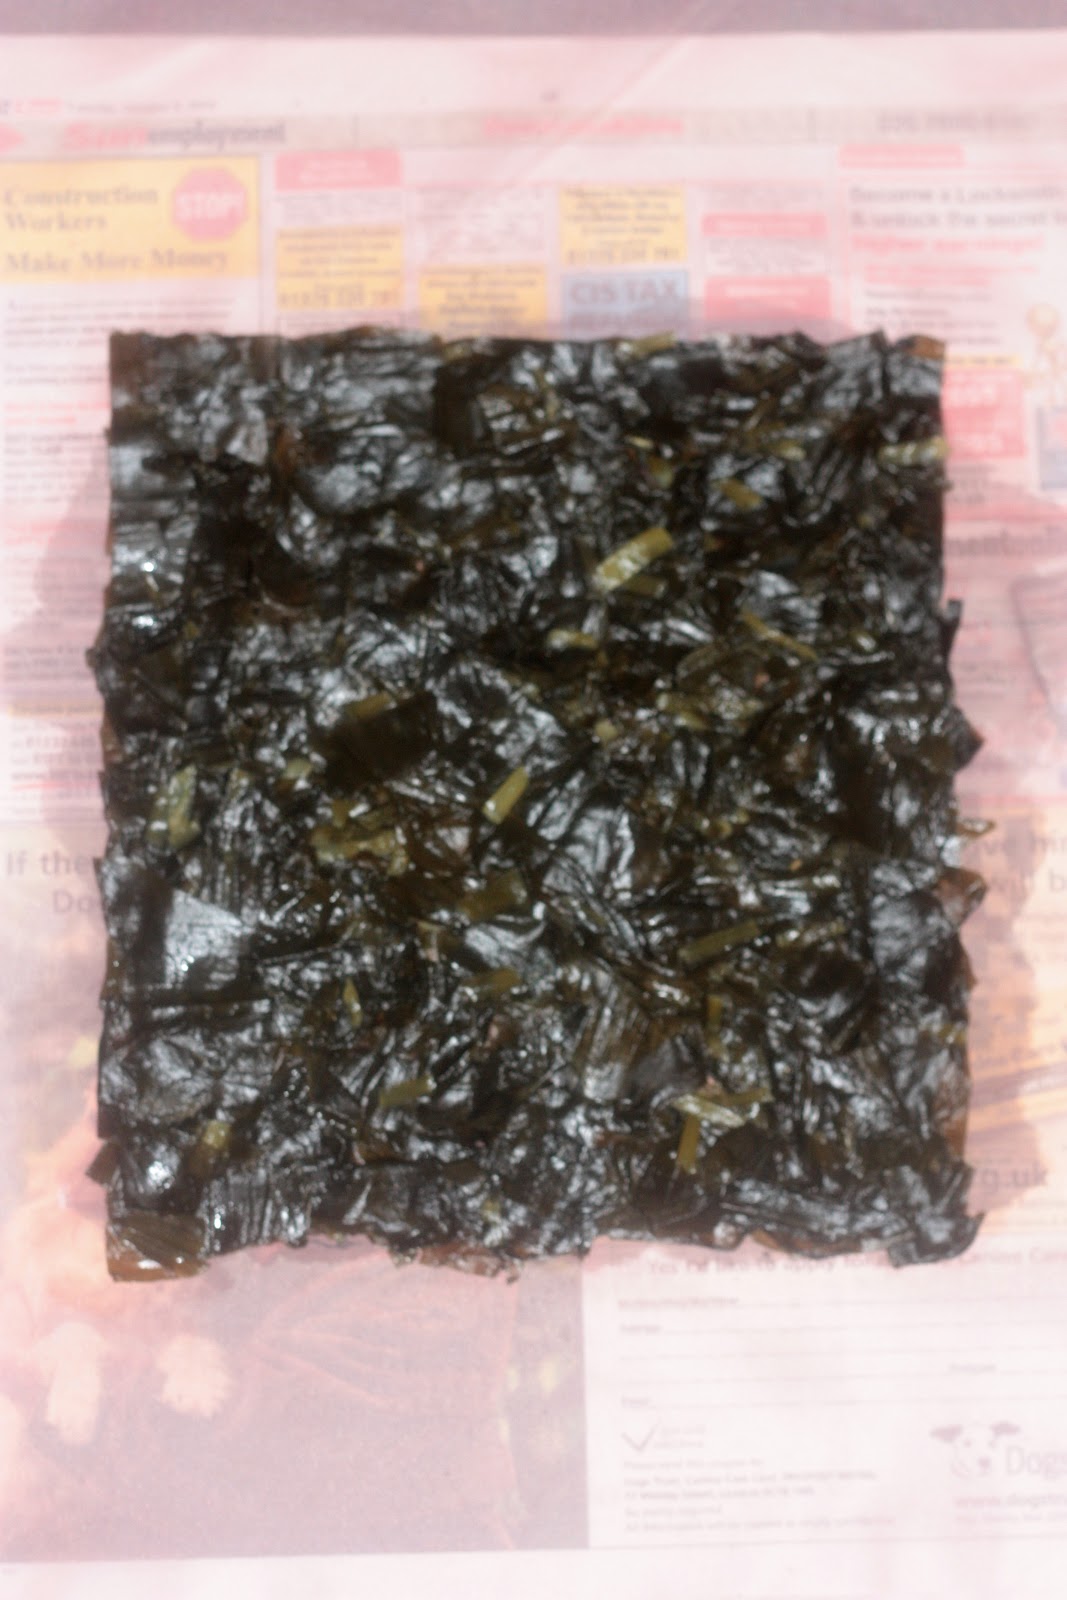
| Nori sheet made with Palmaria palmata (dulse), Cryptopleura ramosa, and Heterosiphonia plumosa |
.
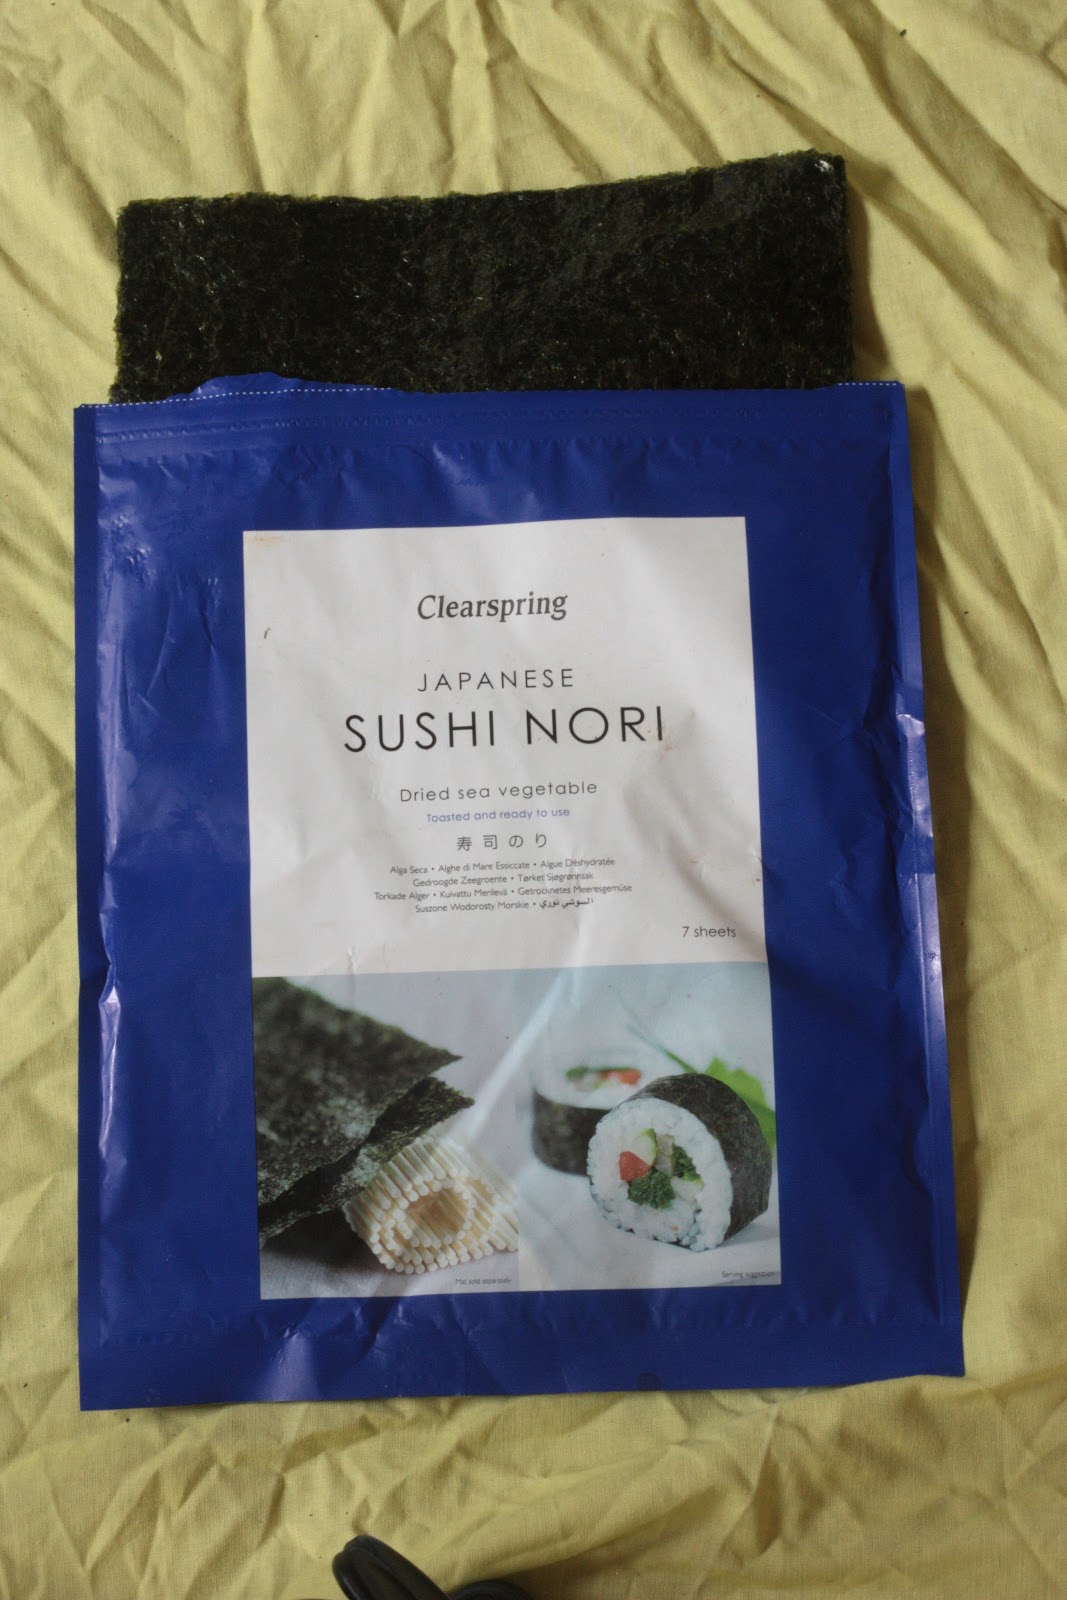
There are of course many brands of commercially and industrially produced nori sheets such as the Clearspring one above. There is no denying the excellent quality and consistency of these, and if you've never made sushi before then using these is a good starting place. On the other hand, several factors spurred me on to make my own. First, as I've indicated, there is simply the wonderful creative challenge and opportunity of working out how to do such things. Of course, I make no claims to originality in this. Nori sheet production arose out of traditional Japanese paper making techniques and has been perfected over hundreds of years. Despite this, my attempts to find any clear instructions in books or using the internet proved entirely fruitless. All references I came across claiming to describe how to make nori sheets from scratch were either just instructions on how to prepare sushi or described the industrial process of nori sheet production. One of my wild food motivations concerns issues of sustainability, and although I benefit from the mass production and global distribution of products such as nori sheets, I feel there is something deeply disempowering about the reliance on such systems and processes. So the creative empowerment that comes from keeping traditional knowledge alive and extending it with one’s own unique contribution is a strong motivating factor for me. Finally, there is the question of choice as well as the opportunity to use locally sourced ingredients.
Traditional Japanese produced nori sheets are primarily made from only one or two different porphyra species; what we in the UK, and especially Wales, know as the common seaweed laver. In Japan, Porphra tenera and P. yezoensis are the ones most frequently used. Given that in the UK we have at least 5 different porphyra species, as well as a number of similarly textured related species, there is great potential for small scale artisan nori production from UK sourced wild seaweeds.
Just before we get on to my experiments with different seaweeds, you might be interested to see the following video that documents nori sheet production from the initial conch shell inoculation, through the growing and harvesting phase, and right through to the final packing of the processed sheets. The technology used is advanced but not ultra high tech and is certainly ingenious. In many respects I admire the ingenuity and creativity from which it sprang; ironic really as I'm currently half way through reading Technological Slavery - The Collected writings of Theodore J. Kaczynski, a, k, a "The Unabomber", as well as John Zerzan's (editor) thought provoking anthology of writings: Against Civilization.
.
Which Seaweed Species Are Suitable For Making Nori Sheets?
From around the shores of the British Isles there are about 20 potential candidates, even more perhaps. So far I've tried and been successful using the following: Ulva lactuca, U. intestinalis, U. rigida, U. linza, Porphyra linearis, P. purpurea, P. umbilicalis, Palmaria palmata, Rhizoclonium riparium, Alaria esculenta, and an unidentified Cladophora species. Indeed, the use of cladophora species is interesting in that, in Laos, sheets, coarser, but not dissimilar to the Japanese nori have traditionally been made: kháy sheets locally produced from a cladophora species that we call Laotian Mekong Weed.
What I mean precisely when mentioning being successful in making nori sheets with the species mentioned above, is that either alone or in combination with one other seaweed they make sheets with a good flavour and texture. On the other hand, the number of potential species that can be incorporated into a sheet extends to 50+ if a certain percentage of powdered edible seaweeds (that for textural reasons can't be made into a sheet themselves) are incorporated into the nori sheet. One might do that to balance out the sheet from a nutritional perspective, a flavour point of view, or simply when playing with colour and the general aesthetics. To that end I've experimented quite a bit with incorporating the highly flavoured pepper dulse (Osmundea pinnatafida) and its relations into a number of sheets (as a powder), as well as Cryptopleura ramosa, Heterosiphonia plumosa, Callophyllis laciniata, Calliblepharis ciliata, Delesseria sanguinea, Hypoglossum hypoglossoides, Plocamium cartilagineum, Lomentaria articulata, Fucus serratus, Saccorhiza polyschides, Laminaria digitata, Saccharina latissima (formerly Laminaria saccharina), Sargassum muticum, Himanthalia elongata, and Codium fragile.
 |
| Rhizoclonium riparium. This has a great flavour, but due to its thin strands is best combined with Ulva lactuca when making nori sheets. Alternatively it makes a fetching wig - in my chubby hamster-cheeked opinion. |
 Porphyra purpurea |
On many occasions individual porphyra specimens can be found that could be used to make fresh nori sheets without further processing. This is what I did for my first attempt to make sushi. If trying this, wash very well to remove sand, soak in acidified water for 5 minutes to kill off any bacteria - at least I like to believe it does; you could of course give it a 995 sacred geometry blessing (or alternatively boil for between 5 minutes and 2 hours and cool), then get wrapping. The result is quite acceptable and delightfully simple (provided you have a VERY sharp knife to cut the rolls - if using raw or only boiling for 5 mins)! The main reason for creating a nori sheet from dried and flaked material is for the improvement in texture, but fresh is definitely the way to go if you're into gourmet camping food.
|
 |
| Set the oven to 184.53°C |
 |
| Delicious pungent herb-packed, pit-baked pike parcels - the favourite food of a-peck-of-pickled-pepper-picking Peter Piper. |
Back to seaweeds suitable for nori making...........

 |
Gutweed, Hulk Hair or Green Mermaid's Hair as I prefer to call it (Ulva intestinalis) has the best flavour of all the Ulva species
|
 |
| Dulse |
my determination to make a nori sheet out of this that was one of the fundamental reasons for my persistence. For absolutely best results only harvest the most tender spring growth in April and May. After that, dry it and store for a year, opening the storage bag for a few hours each month to let a little moisture back in. This allows the flavour to develop as glutamate and mannitol/analine/proline (?) crystals form. I discovered this a number of years ago after initially being disappointed that I'd not managed to keep my dulse completely dry in storage. A recent conversation with fellow forager Miles Irving about experiments with dulse at the Nordic Food Lab confirmed what I already knew: it tastes better stored ever so slightly damp. If you are using aged and slightly off crisp dulse, dry in a low oven for 10 minutes to make it dry enough to crush. Also, you'll find that most of the amino acid salts will fall off onto the drying tray or be left in the bag. For maximum flavour, make sure you retain this and sprinkle it in as you're making the sheet.
The photo above shows the seaweed in May at which point it is thinner and more suitable - although an April harvest is best. From June onwards although the texture is fine at that time for other cooking purposes it's not suitable for nori sheets (at least not how I've described making them). I was just about to post this blog when I bumped into fellow forager Ross Evans who knows about the flavour development in aged dulse. Discussing the use of dulse in nori sheets, he stated an obvious point I was embarrassed not to have considered. That is, if you make the sheets in April or May and store (as described above) for a year, then the nori will naturally deepen and mature in flavour. Very true. Thanks Ross.
How to Make Nori Sheets from Scratch (method 1: Raw -dried, flaked and sprayed).
In this short stop frame animation video I don't mention much about the equipment you need - was too busy trying to keep up my narration as the pictures flew past!
You will see I have a press. This is just a little bigger than A3 size and is made, with adaptions, from an old trouser press I purchased on ebay. You will also need plenty of dry and uncrumpled newspaper, several fine mesh nylon sheets, a spray bottle, some water, and finally, of course, some dried and flaked seaweed. To prepare the latter, ideally collect in spring or summer on a warm sunny day. Rinse it in the sea and also at home if you fancy, squeeze out as much water as possible, pull open the scrunched up pieces and lay out in a single layer on a sheet in the sun to dry. Only do this during daylight hours. Turn all the seaweed over half way through and bring in an hour before sunset (even if it's not fully dry) to prevent it getting damp. Seal in an air-tight bag and lay out again the next day if necessary. Do this until it's crisp. In this country it's rarely hot enough to get it so crisp in the sun that it will crush and break up when you squash it up. To get to that level of dryness, finish it off for 10-60 minutes in a low oven (with the door open), in a food dehydrator or on top of a radiator. After that, crush it all up with your hands in a large bowl or bucket. For the thinner seaweeds it should be possible to do all this by hand, nevertheless, after some initial crushing, it can be helpful to put the seaweed in a food processor to grind up a little further. For best results flakes should be between 1-5 mm across; most being 3 mm.
Incidentally, my initial reason for making this press was simply to press seaweeds to create a record of my finds. If you've not done this it's well worthwhile. Pressed seaweeds are beautiful in their own right, as of course they are left in the sea. In fact, I really do believe that pressed seaweeds make inspired and inspirational art works.
 |
| Sea Beech Delesseria sanguinea |
 |
| Sea Lettuce Ulva lactuca |
 |
| Dabberlocks Alaria esculenta |
What is wild food? Is it simply food? Is it medicine? Is it a work of art? Is it a life style? Perhaps it’s some or all of these things, aspects, and processes. I think that as human beings we tend to over compartmentalize, certainly I tend to. Some compartmentalization of thought and the actions issuing from that thought may be necessary for everyday adaptive functioning in the world; on the other hand, over compartmentalization suffocates a deeper more inclusive and reciprocal awareness and is anathema to free flowing creativity, to a deeper realization of connectivity, and the mutual interplay between seemingly different realms of existence. Wild foods are my medicines. Wild foods are my art. I am the art of wild foods. Hence, The Foraged Book Project.
A few months ago I was contacted via email by artist James wood. We’d never met. I didn’t know him. He said,
“I was wondering if there'd be any chance, as I'm not sure what type of work you're doing at the moment, if you would ever take on a type of apprentice to pass the knowledge you've collected on foraging food over to? And, if yes, whether that apprentice could be me, obviously we would need more contact first but it's something to think about.”
I get a fair number of emails like this. In fact, I love emails like this as I’m all for connecting and sharing with others. And yet, in the past 2 years after responding positively to such emails, all of these people have completely wasted my time by not showing up. Sadly, although I would like to reply courteously and positively to everybody irrespective of my negative past experience, in the past few months I’d decided enough is enough, and would have told James that I was far too busy. But how could I resist his further explanation:
“I'm currently studying on my third year of a Fine Art BA at Nottingham Trent University. Over the past two years I've been trying to make my own organic pigments and paper from locally foraged materials. I've managed to get the three primary colours from local privet fruit - purple/blue, Spindle Tree - yellow and cleaver roots for red. There’s also a black and white among other colours which can be used with egg yolk to create a suitable paint. I'm not sure how interesting you may find this but I thought it would be good to give you a bit of back ground.”
Of course, given that I’ve been making paper from various fungi for a number of years and have enthusiastically dabbled and doodled with pollen and spore paints (below), these words were music to my ears. For the first time ever I found myself sending a first email to somebody I’d never met or spoken to enthusiastically suggesting that we should make a book together, now! Arts Council funding awaits, fingers crossed. The aim is to produce a wild food book made entirely from natural foraged materials, with the text
and illustrations created using plant dyes, pollens and fungal spores. Artist Julia Groves, and perhaps Tasha Aulls are collaborating too. Please check out The Foraged Book Project and get in touch if this interests you.
.
 |
| Various papers made from Birch Polypore (Piptoporus betulinus) and Dryad's Saddle (Polyporus squamosus) Fungi. |
 |
| Flower doodle using Reedmace pollen (Typha latifolium), Cramp Ball spores (Daldinia concentrica) and green walnut husk extract. |
 |
| Cramp Balls/King Alfred's Cakes fungi (Daldinia concentrica) sporulating 5 days after being removed from log. |
 |
| After 7 days. |
 |
| Gathering up the spore mass. |
 |
| Keeping the inspiration alive. Find somebody with more artistic abilities who thinks painting with fungi spores is interesting rather than an excentric waste of time; in this case my friend, artist and freediving supremo Anna Paraiyar. |
How To Make Nori-Style Sheets From Scratch (a quick diversion - just in case we haven't had enough of them already and because life isn't all about seaweed....or is it.....)?
FUNGI
Technically nori refers only to seaweed. However, I realized that once a technique is mastered - or at leastlearnt; I'm a long way from mastery! - Why not play with it? Why not use it in unexpected but worthwhile ways? To that end I wondered what other wild and flavoursome foods could be used. The most obvious candidate was the Winter Chanterelle fungi (Cantharellus tubaeformis) I'd picked at the end of December, although I had my doubts - that proved right, that they would not be flakeable in either a fresh or dried state. Blitzing them up fresh resulted in a lumpy unspreadable mass. Drying them raw or cooked and then attempting to flake them resulted in a brown (from raw) or black (from cooked) powder with numerous hard granular bits. However, I did devise a method that makes superb and delicious semi-dry sheets.
 |
| Fresh Winter Chanterelles (collected 30th Dec) |
 |
| detail |
First I cooked them in a pan with about 2 tablespoons of water - more water isn't necessary because after 10 minutes of cooking the fungi have cooked down sufficiently to release much of their own liquid. I strained this off, reduced it down to a paste and stirred this flavoursome stock back in with the fungi whist heating to remove as much excess moisture as possible. To improve the flavour I also mixed in some finely powdered Boletus edulis (Cep/Porcini) powder.
.
 |
| Cooked and strained fungi with cooking liquor reducing in the background. |
The fungi then need to be chopped as finely as possible and left to cool....

......before being carefully laid out and shaped into a square on the nylon sheets of the press. In order to facilitate this it was far easier to roughly spread the chopped fungi out first, lay a piece of nylon on top and squash and spread with the fingers through the second sheet.
.
.
 |
| Evening out the layer of chopped fungi. |
.
 |
Dried fungi sheet after 3 days
|
 |
| After 12 hours in the press. Perfect for immediate use! |
LEAVES
For the most part, when I think about drying wild leaves it's usually because I'm planning to store them to make drinks. Leaves, though, as a wrap or finely chopped external covering do definitely have a place in wild and not so wild cuisine. Think of the nettle used on the outside of Cornish Yarg cheese, vine leaves as a wrap for both sweet and savoury items in Greek cuisine, and over the years I've used all sorts of wild leaves both raw and cooked to wrap various foods. Nevertheless, even given my experience, the thought of flaked and dried leaves to make sushi didn't have much appeal until, that is, I discovered the incredible flavours of lacto-fermented/krauted wild greens. Over the past few years I've been experimenting a great deal with wild leaf ferments. Plants with a robust flavour seem to work best, so many members of the cabbage family work really well, as do such taste sensations as alexanders or the seriously pungent ramsons/wild garlic. The latter is so good that over the Christmas period whilst doing all this experimentation I ran out of my own supply.
As good fortune would have it my friend and fellow born-to-be-wild forager Miles Irving of Forager only lives a few minutes’ walk up the road, and his base of operations is just down the hill. Quite some time ago I'd been enthusing to him about lacto-fermenting wild greens and getting him to taste some of mine. This must have left a good impression because what I hadn't realized until about a month ago, is that rather than making small batches in 1kg jars as I'd been doing, he'd began making leaf ferments in 40 litre barrels. Another difference was that whereas mine were quite complex involving balancing out the flavours with other grated vegetables, his were simplicity itself: leaves and salt. I popped down to his workshop and he gave me 1kg of his lacto-fermented wild garlic leaves. Thanks Miles! Absolutely delicious! In spite of writing a somewhat elaborate blog about making your own nori sheets, sometimes, much of the time, simplicity is the best approach.
.
 |
| 1kg of 8 month aged lacto-fermented wild garlic leaf |
 |
| My attempt to dry and flake it to make sheets didn't work. It doesn't hold together. Building up the sheets using fresh material did work. |
 |
| Fresh sheet before pressing. |
 |
| Dry sheet after 3 days in the press. |
 |
| Tasty dried and powdered wild garlic lacto-ferment seasoning. |
So did it work; was it a success?
What I came to realize years ago in working with wild foods, and in life generally, is that to be too caught up in the desire for a preconceived successful outcome, and certainly one that can blind to other possibilities, can lead to missing new opportunities and making new discoveries. In a sense then the answer is both "yes" and "no". It wasn't entirely successful in terms of my initial intention, and as a result I wasn't able to make a nori-style sheet from dried and flaked leaves. However, when after 3 days in the press I tipped out the dry material that hadn't congealed, I didn't throw it away but instead dried and ground it down further. It makes a wonderful seasoning on its own or mixed with flour. This is something I'd not even considered before. Next, because I'd not been able to make a sheet from dried and flaked material, I thought I'd just build up a sheet from the fresh lacto-fermented leaves. To do that it was useful to initially squeeze out as much liquid as possible. The discovery here is that the liquid alone is absolutely delicious and could stand as a worthy liquid condiment in its own right. I drank the whole glass. Also this liquid extract is going to be fabulous to experiment with in various liquid condiments I've been making with tasty seaweed and mushroom extracts. In terms of the finished dry sheet made from the fresh leaf ferment, it did hold together well. On the other hand, drying it completely did somewhat toughen it. This doesn't mean you can't make and store them, only that if you want to use them for sushi then you need to make the roll the day before then leave it wrapped in cling-film or similar in the fridge over night. That re-softens the leaf sheet. Nevertheless, similar to working with the fungi sheet, I found that for absolutely best results, the sheet should be built up from fresh lacto-fermented leaves, pressed for 12 hours and then used immediately. At that stage, it holds together well, the texture is still good, and it's very easy to handle.
Back on the topic of nori sheets genuinely made from seaweed for a second; what I forgot to mention was how delicious a sheet made from lacto-fermented Ulva intestinalis was. The jar shown below is one I took on a course I was running for a group of 8 chefs. It has been fermenting for over a year and the flavour is delicious (in my opinion), but completely divided the chefs. Half loved it and half loathed it.
PICKLED ROSE PETALS
Pickled rose petals, in this case Japanese Rose (Rosa rugosa), are one of those fantastically versatile ingredients that can happily complement and enliven both sweet and savoury dishes.
.
What I came to realize years ago in working with wild foods, and in life generally, is that to be too caught up in the desire for a preconceived successful outcome, and certainly one that can blind to other possibilities, can lead to missing new opportunities and making new discoveries. In a sense then the answer is both "yes" and "no". It wasn't entirely successful in terms of my initial intention, and as a result I wasn't able to make a nori-style sheet from dried and flaked leaves. However, when after 3 days in the press I tipped out the dry material that hadn't congealed, I didn't throw it away but instead dried and ground it down further. It makes a wonderful seasoning on its own or mixed with flour. This is something I'd not even considered before. Next, because I'd not been able to make a sheet from dried and flaked material, I thought I'd just build up a sheet from the fresh lacto-fermented leaves. To do that it was useful to initially squeeze out as much liquid as possible. The discovery here is that the liquid alone is absolutely delicious and could stand as a worthy liquid condiment in its own right. I drank the whole glass. Also this liquid extract is going to be fabulous to experiment with in various liquid condiments I've been making with tasty seaweed and mushroom extracts. In terms of the finished dry sheet made from the fresh leaf ferment, it did hold together well. On the other hand, drying it completely did somewhat toughen it. This doesn't mean you can't make and store them, only that if you want to use them for sushi then you need to make the roll the day before then leave it wrapped in cling-film or similar in the fridge over night. That re-softens the leaf sheet. Nevertheless, similar to working with the fungi sheet, I found that for absolutely best results, the sheet should be built up from fresh lacto-fermented leaves, pressed for 12 hours and then used immediately. At that stage, it holds together well, the texture is still good, and it's very easy to handle.
Back on the topic of nori sheets genuinely made from seaweed for a second; what I forgot to mention was how delicious a sheet made from lacto-fermented Ulva intestinalis was. The jar shown below is one I took on a course I was running for a group of 8 chefs. It has been fermenting for over a year and the flavour is delicious (in my opinion), but completely divided the chefs. Half loved it and half loathed it.
 |
| 1 year aged lacto-fermented Ulva intestinalis. I dried and flaked this before successfully creating nori sheets with it using method 1 |
PICKLED ROSE PETALS
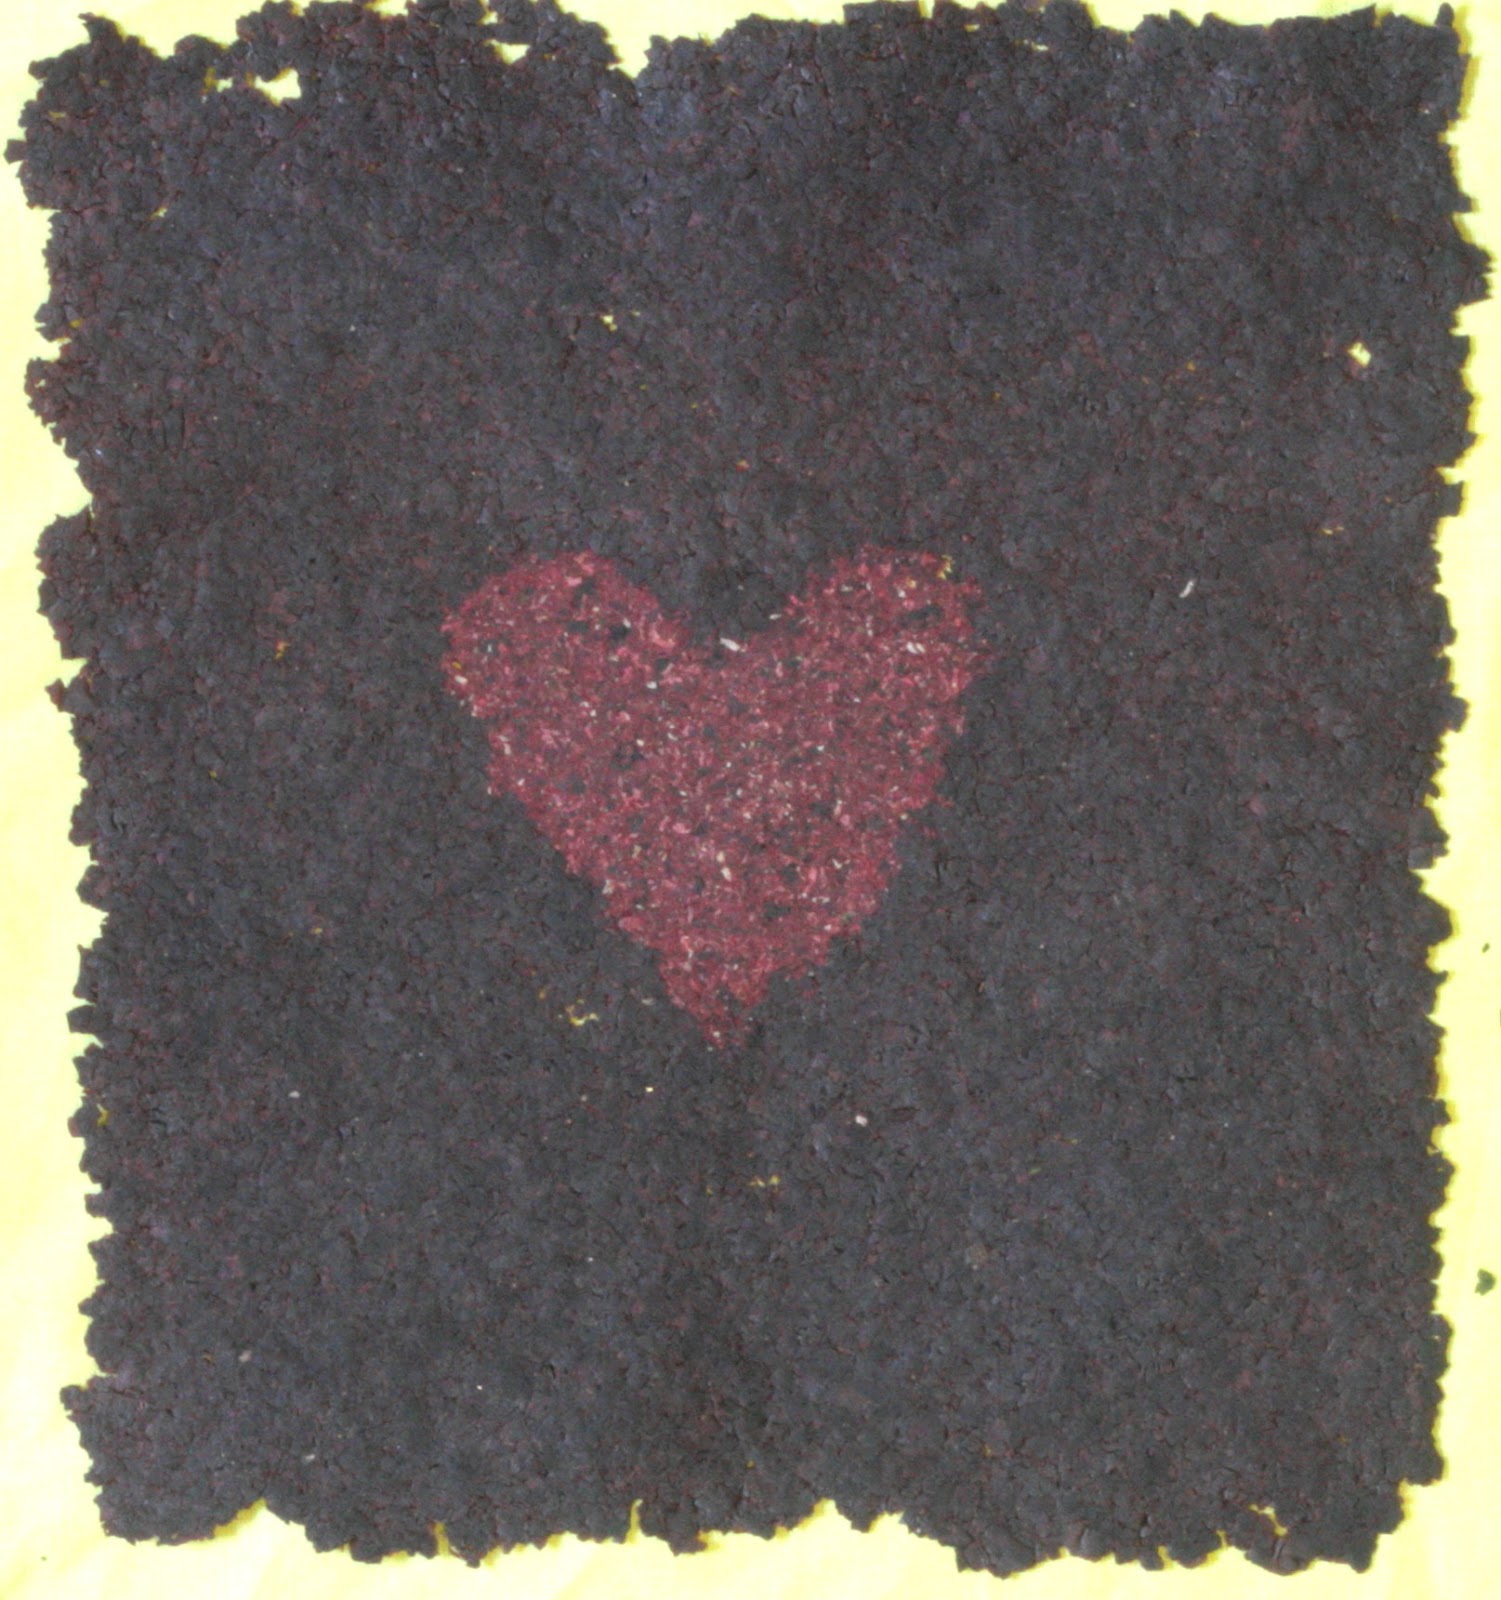
Pickled rose petals, in this case Japanese Rose (Rosa rugosa), are one of those fantastically versatile ingredients that can happily complement and enliven both sweet and savoury dishes.
.
 |
| Pickled Japanese Rose petals (From Miles Irving's stash - thanks again Miles). |
That I've not pickled rose petals before is something I find very strange. After all, I've dabbled in pickling almost every other wild food to the point of absurdity. Here are a few examples of some very basic pickling recipies. Perhaps the main reason is that all the petals I've gathered have been dried and powdered, finding their way into spice mixes or into cakes, biscuits and desserts, or have found their way into drinks such as sweetened rose petal vodka (below).

Having only a limited supply of pickled rose petals for this experiment, and learning from the experience of trying to make nori-style sheets from both fungi and lacto-fermented wild greens, I thought I'd skip (for now) the attempt to dry and flake the pickled rose petals and go straight for a semi-dry sheet made with the fresh pickle.
For those of you that have tasted the profound benefits of a regular meditation practice but, like me, for some inexplicable reason, have lapsed and now find it difficult to incorporate into life on a regular and formal basis, making pickled rose petal sheets is for you! I'm playfully very serious. Of all the nori sheet experiments described in this blog, making this one had the potential to be the most slow and frustrating. Indeed, it was the slowest. In the first place, all the petals as they come out of the jar are all scrunched up and need to be individually smoothed out. Secondly, I had thought that one layer of petals would work but that a thicker and therefore more robust sheet would be easier to handle as well as being more flavoursome (turned out that, surprisingly, one layer was perfect). As a result it took 1 1/2 hours just to lay out two sheet, one with a single layer of petals, the other with two. Normally in such situations I'd be pulling my hair out in frustration after 10 minutes. And yet, the spirit of the rose is so beautifully calming, so serene, so gentle, so loving. Breathing out, I picked a petal from the pile, breathing in, I unfurled it, breathing out, I lay it down, breathing in, I paused before breathing out and reaching for the next petal and entered a timeless realm..........
Just reflecting for a few minutes, I can think of all sorts of creative dishes this could be used in, not having tried any of them yet though I will remain silent until I can speak from experience.......
FRUIT
You may be familiar with fruit leathers? These essentially, at their simplest, are thin layers of 100% flexible fruit pulp dried in thin sheets to exclude all moisture - although with a low sugar content they can be somewhat brittle. Made very thin they have great potential for artistic wrappings in meat dishes and, more obviously, desserts.
Now, you might be thinking this is too great a departure from nori or nori-style sheets to be included here, that I've gone mad, and that even when I wrap up to stay dry by putting on my coat to go out in the rain, I say to my girl friend, "hang on a second I've just got to put on my nori sheet!" Yes, you'd be right; every wrapping can't be classified as a nori or nori-style sheet. However, in recent years I've got into candying various seaweeds, after coming across some decent looking recipes in a number of books written by people who didn't look or sound like they'd lost their minds. Also, I'm quite obsessed with candying. That, combined with the fact that I'm always looking at new ways to incorporate seaweeds into my diet, made me think about incorporating candied (or uncandied) seaweeds into fruit leathers. Then, of course, we will have a sheet incorporating flaked seaweed and can call it nori to our heart's content.
I only had this thought yesterday so haven't had the opportunity to try it yet. The good news for me, and anybody who might like to try, is that right now in January it's possible to make my two absolutely favourite fruit leathers: rose hip, and strawberry tree fruit.
Rose hip fruit leather is amazing (provided you don't pick fermenting ones - they're usually a weird orange colour or, when you squeeze them, liquid is the first thing to ooze out rather than pulp). Simply boil up the hips in water, mash, strain and reduce down the liquid. Transfer to a nonstick sheet and dry further. The result, although wonderfully flexible due to the high sugar content, looks amazingly like stained glass, having the taste and texture of fruit pastels. My plan is to mix in powdered seaweed or ground candied seaweed after the final boiling.
Strawberry Tree fruit are fantastic. The species part of the botanical name for the plant, Arbutus unedo, means "I eat one only". This is obvious really, because after eating only one, you'll immediately be thinking what a fantastic fruit leather it will make, so will be too busy gathering to eat any more.
.
Having only a limited supply of pickled rose petals for this experiment, and learning from the experience of trying to make nori-style sheets from both fungi and lacto-fermented wild greens, I thought I'd skip (for now) the attempt to dry and flake the pickled rose petals and go straight for a semi-dry sheet made with the fresh pickle.
 |
| Building up the sheet from wet pickled rose petals. |
 |
| after 12 hours |
 |
| After 4 days. |
FRUIT
You may be familiar with fruit leathers? These essentially, at their simplest, are thin layers of 100% flexible fruit pulp dried in thin sheets to exclude all moisture - although with a low sugar content they can be somewhat brittle. Made very thin they have great potential for artistic wrappings in meat dishes and, more obviously, desserts.
Now, you might be thinking this is too great a departure from nori or nori-style sheets to be included here, that I've gone mad, and that even when I wrap up to stay dry by putting on my coat to go out in the rain, I say to my girl friend, "hang on a second I've just got to put on my nori sheet!" Yes, you'd be right; every wrapping can't be classified as a nori or nori-style sheet. However, in recent years I've got into candying various seaweeds, after coming across some decent looking recipes in a number of books written by people who didn't look or sound like they'd lost their minds. Also, I'm quite obsessed with candying. That, combined with the fact that I'm always looking at new ways to incorporate seaweeds into my diet, made me think about incorporating candied (or uncandied) seaweeds into fruit leathers. Then, of course, we will have a sheet incorporating flaked seaweed and can call it nori to our heart's content.
I only had this thought yesterday so haven't had the opportunity to try it yet. The good news for me, and anybody who might like to try, is that right now in January it's possible to make my two absolutely favourite fruit leathers: rose hip, and strawberry tree fruit.
Rose hip fruit leather is amazing (provided you don't pick fermenting ones - they're usually a weird orange colour or, when you squeeze them, liquid is the first thing to ooze out rather than pulp). Simply boil up the hips in water, mash, strain and reduce down the liquid. Transfer to a nonstick sheet and dry further. The result, although wonderfully flexible due to the high sugar content, looks amazingly like stained glass, having the taste and texture of fruit pastels. My plan is to mix in powdered seaweed or ground candied seaweed after the final boiling.
Strawberry Tree fruit are fantastic. The species part of the botanical name for the plant, Arbutus unedo, means "I eat one only". This is obvious really, because after eating only one, you'll immediately be thinking what a fantastic fruit leather it will make, so will be too busy gathering to eat any more.
.
 |
| Most typically in the South East of England this fruits in late Nov/early Dec but can fruit much later. |
 |
| After 15 minutes picking. |
 |
| The raw fruit is mashed and passed through a seive to remove the granular parts, and then squeezed through a fine cloth. |
 |
The raw pulp is spread out on a non-stick sheet before being put on a tray left on the food dehydrator for about 8 hours. I plan to mix in powdered seaweed to the raw pulp before spreading.
 |
The flavour is the nearest you'll get to tropical fruit from something you've harvested in the UK. Imagine a cross between mango, papaya and persimon. This is not obvious from eating the fresh fruit. Coincidentally, I've just noticed that one of my favourite wild food bloggers, Jonathan Hamnet - who emailed me a couple of days ago with generous words of encouragement - has some interesting things to say about this fruit's inclusion in a fruit leather: Trail Food from the Golden Age of Man.
THE WEIRD!
So far we’ve looked at the use of seaweeds, fungi, lacto-fermented wild leaves, fruit leathers and pickled rose petals as suitable for making nori or nori-type sheets, but we haven’t yet considered anything really wacky. A short time ago a facebook friend and fellow forager Sally Harte posted a picture on line of some small green slimy thing asking what it was. I said it looked like some kind of horrible cyanobacteria. Why ‘horrible’ I don’t know? A little further research by Sally revealed it to be a type of cyanobacteria known as Nostoc commune. Given that I see this quite frequently, coupled with the fact that, according to the Wikipedia link, it is eaten in Japan, China, Indonesia and the Philippines, I rushed out to the nearest spot I know where it grows in profusion. Alas, none was there. I’m sure this would make a great nori-style sheet so can’t wait for it to start growing again.

How To Make Nori Sheets From Scratch (method 2: The wet paper-making way using dried and flaked and then cooked seaweed).
An aside: I got hold of a super impressive microphone not with a view to narrating these stop-frame videos, but to support and publicise my friend Mark Boyle's excellent recently published book The Moneyless Manifesto through creating a free on-line audio version of the book. I was rather blasé about the ease of doing this, especially when he told me an actor audio-booked his first book. "Who needs actors", I said! Given that it took me about 4 attempts to narrate each of these videos I'm now laughing at my, at best, naive optimism, at worst, misplaced arrogance. But, I will still try to do it........ In the meantime the book can be purchased or read for free at: http://www.moneylessmanifesto.org/ (I contributed a short article on making leaf curd).
Trouble Shooting (for method 1: Dry, flake and spray).
Help! Day 3 of pressing and my nori sheets are going mouldy!
Yes, during my first attempt to make these the tell tale signs of white mould spots started to form from the centre of the nori, spreading out with each passing day, whilst , in denial, I continued to convince myself that these spots where just benign salt deposits forming as the sheets dried. We see what we want to see!
 |
mould!
|
Obviously mould is unwanted. In order to prevent this there are a number of variables to consider. Taking into account just one of them may solve the problem; adjust your technique to address all of them and success is guaranteed.
In order to grow, mould needs water, food and time, and will occur if the sheets aren't dried quickly enough. In a solid press like mine the sheets dry in 3-4 days in an averagely warm room. Ideally drying time should be no more than 3 days and ideally two. The time taken to draw out the moisture can be reduced in 3 main ways: Change the newspaper more frequently - 3 times a day rather than 2. Increase the temperature by placing the press in a warm airing cupboard or on top of a radiator. Use a press that allows for better moisture evaporation. For example, most seaweed presses are of the wooden lattice design and are tied up with straps. The problem with that is that for the purposes of nori sheet making you can never get it tight enough. An ideal design would be a lattice wooden or metal press that can be screwed down like mine. Must make one of these.......
Another idea if after a day or two you spot the early signs of mould is to stop it in its tracks by lifting the half dried sheets from the press and drying quickly by some other means, such as using a radiator, food dehydrator or low oven. Do dry them flat if doing this and be sure to return them for a final press before they become too dry and brittle to handle.
I also found that liquidizing a couple of garlic bulbs in my water spray greatly reduced the likelihood of mould forming, although, of course, it left a garlic flavour that might not always be wanted.
Finally, if you do have a problem with mould, don't use the same newspaper for your next batch of sheets, and wash and dry the nylon sheets very well before re-use.
Help! My sheets are dry and look great in the press but when I take them out they just disintegrate.
Several things could have occurred here. It could be one of, or a combination of the following reasons: your flake size is too small; your sheet is simply too thin; the flakes are just too thick; you are using a plant material that no matter how you prepare it, it simply will never hold together. A good example is lacto-fermented wild garlic leaf. It tastes delicious, dries, flakes and sprinkles well, looks like it’s held together but disintegrated. In the case of wild garlic and some other plant leaves this problem can be got around by creating the sheets by laying down fresh leaf material – a bit of a fiddle, but worth it. If using fungi, the building up of sheets by laying down finely chopped cooked fungi is the only method I’ve used that works. Drying and attempting to flake fungi generally results in an unpressable powder or big and unpressable hard granules.
Help! I’ve pressed the sheets for 3 days and have just removed them from the press to put over the radiator/food dehydrator/low oven so as to remove all moisture and prevent mold formation, but now they are not flat, are very brittle and I can’t flatten them out without breaking them!
or....
Help! My sheets are dry and hold together well, but when I come to roll them to make sushi they crack and break.
Okay, yes, this happened to me and, yes, it was bloody annoying! If you have a room in your house that is fairly damp, just leave the sheets there for an hour or two (or even a day or two) to take on a bit of moisture from the air; alternatively place on a tray and leave outside (assuming it’s not raining or snowing)!! Both these methods only really work during the cooler months of the year. Alternatively, soak a tea towel and wring out VERY well so that it’s just damp. Carefully lay over the nori sheet for a few minutes. Finally, being very careful not to over soak – and from a distance of a few feet - you can spray a few pumps of water over the sheet and leave for a few minutes.
A completely different technique that works very well is to add a tiny amount of oil during the process of creating the sheets. To do this, make the sheets in the usual way, i.e. by spraying a fine mist of water (not oil) over the sheets and then press for two days. After that, before pressing again, spray over about 4-5 light mistings of fine oil spray on each side of the nori sheet. Actually, 4-5 sprays each side is only appropriate if you have a spray nozzle that works with oil. I’ve used the oil spray ‘bottles’ you can buy in the supermarket – weird people worried about their fat consumption use them (apologies if that means you - weirdo) ! If you’ve been spraying with a nozzle designed to spray water or alcohol, trying to use it to spray oil will result not in misting but, rather, in jets of oil as if you’re firing a water pistol. Not to worry though. Simply mix olive oil and water in a 1:1 ratio and shake well before spraying. Using this method requires about 20 sprays each side of the sheet. It is important to bear in mind that such oil spraying should only be done after the sheet has been pressed first and certainly not during the process of building up the sheet initially, to do so would adversely affect the binding of the sheet so that it would be more likely to disintegrate. Note: If doing this, especially if you intend to store the nori sheets for quite a while, don’t use an oil such as walnut or hazel nut oil as they are more likely to go rancid than other oils, e.g. olive oil. Also be aware that when using the oil method it can sometimes be hard to tell if all moisture has been removed. As in most things, practice and experience makes perfect!
By the way, you might be wondering why, if the oil method is such a good technique I don’t just write about that and thus avoid all the potential problems that can result (if you’re not careful) from using water spray only? There are two reasons. In the first place, I’m trying to mimic traditional non-industrial processes, i.e. the way I suspect (without much evidence other than a strong intuition) that I would imagine the Japanese used to make nori sheets for hundreds of years. Secondly, in 2013 (from 1st April or May – not quite decided) I’ll be attempting to live for a year entirely on wild/foraged foods. For me, the creation of these nori sheets is part of the detailed experimental research I’m doing in preparation for that year. In terms of fats/oils, so far I’ve managed to extract walnut oil (that goes rancid after prolonged storage) and badger fat (that I can’t get to form a spray). Of course, olive oil works really well, but I won’t be able to make that in 2013 in the UK.
Help! I think I’ve got the flake size right but am having trouble creating sheets of an even thickness.
Several factors lead to this problem. Make sure that the fabric squares that you are sprinkling the seaweed on to are completely flat (iron them if necessary). Also make sure you have covered the fabric with a fine mist of water spray. When it comes to sprinkling the seaweed, using a sieve can help (although most have holes that are too small). Also, sprinkling a very even thin layer first, then spraying (water) before adding a second layer is better than trying to get a full thickness in one covering. After that, if any background cloth can be seen, just take a pinch of dried seaweed and cover individual gaps. Spray well a final time waiting a few minutes for the water to be absorbed before pressing.
Help! My sheets turned out perfect but I’ve stored them for a month and they have gone mouldy.
After all that effort this would be a frustrating outcome indeed. I store mine in the same way as you’d find nori sheets when you buy them in the shops, that is, stored flat and completely dry in a plastic bag with an air-tight seal. Similarly, as many commercial producers do, you can put a small pack of silica crystals in with your nori sheets to attract any unwanted moisture. The use of silica crystals is very useful if you initially used seaweed that was only rinsed in the sea and, hence, has a substantial amount of moisture attracting salt in/on it. Of course, you could just have rinsed in fresh water initially. Yes, that’s obvious, but sometimes the nori does taste better when the seaweed has a natural coating of sea salt, and in actual fact no matter how you initially prepared the nori it will still attracted water and potentially degrade if you don't take precautions.
Sushi Recipe
Ingredients (to make 2 rolls)
2x 3oz skinless salmon steaks
some short grain rice, cooked and cooled
Marinade: juice of 2 pink grapefruit juice of 2 limes
juice of a large lemon
1 medium sized red onion finely chopped
some finely chopped fresh ginger
some finely chopped garlic
some finely chopped fresh chilli
1-2 table spoons liquid aminos/soy sauce or similar
Sun-dried tomato paste
1 spring onion
1 ripe avocado
a little freshly grated horse radish
1 tablespoon finely chopped bell pepper
2 teaspoons wild charlock seeds (or other mustard seed)
4 tablespoons of lacto-fermented wild green*
Method
*I see from the label on my jar of fermented wild greens that it was made on 29th March 2012 and contains chopped Hedge Mustard (Sisymbrium officinale), Common Nettle (Urtica diocia), Rape leaf (Brassica napus), diakon radish, onion, carrot, sweet red pepper, a little chilli pepper, sea salt and whey.
I started this blog with a quote from lovely fellow forager Rachel Lambert, suggesting that: "Life is too short to try and work out how to make nori sheets from scratch!" Well, there's a long debate to be had there. In some respects though she may well be right. Nevertheless, for me what's important isn't so much the goal as the journey; living each moment of that journey intensely, creatively, playfully, and with a full awareness of the possibilities of any given moment along the way - actually I'm sure Rachel would agree too. It ain’t easy!
I want to finish with a quote too, about another journey. Quotes or discussions with people that suggest something can’t be done or isn’t worth doing, I find act as a great stimulus to action.
Writing In Proceedings of the Oxford Symposium on Food and Cookery 2004: Wild Food, Susan Campbell claimed not to have “met anyone who could convince [her] that modern man could subsist on wild food alone, legally or illegally, the year round, in a northern climate.” – from The Hunting and Gathering of Wild Foods: What’s the Point? An Historical Survey.
Beginning later in the year, April or May, I intend to try and convince her, and myself, that it is in fact possible to live entirely on wild food the year round in a Northern climate. I’ll be writing more about that project in the next blog.
I hope I can count on your support because I can't do it alone...................
Labels: Arbutus unedo, candying, foraging, fruit leather, krauting, lacto-fermenting, nori paper, nori sheets, nostoc commune, pickled rose petals, pickling, pressing seaweeds, strawberry tree fruit, wild food
posted by Fergus @ 4:43 AM
11 comments
![]()